Stewart, that is. I thought I’d start a new blog full of recipes, crafts, and just stuff I’m interested in or have found useful. I’m not the craftiest person. I’m not the best cook. But I do have lots to say and now you all can partake. But let’s face it, I’m no Martha.

Showing posts with label my favorites. Show all posts

Saturday, September 10, 2011

GRANOLA

Basically I took two granola recipes and combined the two. I took a few things here and there, omitted a few things and VOILA! THE. BEST. GRANOLA. EVER. I didn’t take any pictures, but take my word for it. You’ll be impressed. I promise.

Granola Recipe

· 6 cups oats

· 1 cup cranberries

· 1 cup coconut

· 1-2 cups pecans (chopped)

· 1 tsp salt

· ¼ cup brown sugar

· 1 T. cinnamon

· ¾ cup honey

· ¼ cup maple syrup

· 2 tsp vanilla

· ½ cup vegetable oil

Combine dry ingredients in large bowl. Combine wet ingredients and microwave for 2 minutes bringing to a boil. Stir wet ingredients then add to the large bowl of dry mixture. Mix thoroughly. Spread Granola on 2 cookie sheets. Bake at 325 degrees for 20 minutes. Let cool. Store in air tight container.

Sunday, July 24, 2011

FABRIC BANGLES

I made these with my nieces for Cousin’s Camp…
bracelet-tutorial
A friend of a friend had put this up on her website with a SUPER easy to follow tutorial. The girls LOVED THEM. They thanked me endlessly for showing them how. I informed them that they could use an old t-shirt (jersey knit – with some stretch to it) to make these bracelets. I just hope they don’t go home and start cutting up clothes and then say “but Aunt Kristy said we could.”

Here is where you can find the
tutorial. Thanks Missy!

Tuesday, June 14, 2011

BEST BROWNIES EVER!!

These are SERIOUSLY THE BEST BROWNIES I’ve ever tasted. They are simple and fast to prepare. Just as fast as from a box. If you’re ever in need of a chocolate fix, turn to these.

Ingredientsbrownies
  • 1 cup butter, melted
  • 3 cups white sugar
  • 1 tablespoon vanilla extract
  • 4 eggs
  • 1 1/2 cups all-purpose flour
  • 1 cup unsweetened cocoa powder
  • 1 teaspoon salt
  • 1 cup semisweet chocolate chips
 
Directions
  1. Preheat oven to 350 degrees F (175 degrees C). Lightly grease a 9x13 baking dish.
  2. Combine the melted butter, sugar, and vanilla in a large bowl. Beat in the eggs, one at a time, mixing well after each, until thoroughly blended.
  3. Sift together the flour, cocoa powder, and salt. Gradually stir the flour mixture into the chocolate mixture until blended. Stir in the chocolate morsels. Spread the batter evenly into the prepared baking dish.
  4. Bake in preheated oven until an inserted toothpick comes out clean, 35 to 40 minutes. Remove, and cool pan on wire rack before cutting.

Tuesday, May 3, 2011

Homemade Kettle Corn

DROOOOOLLL… I love this stuff. I wait every year for the NC State Fair to come in October so I can stuff my face full of this stuff. It’s one of my favorites. Well after many many tries, I have perfected popping this delectable snack on my stove… without burning it… which is a challenge in itself.  It’s really easy (once you get the hang of it) and TOTALLY worth it. Here’s some step by step instructions. Try it!!

IMG_0021

What you’ll need:

  • A bag of popcorn kernels – 1/2 cup
  • 1/4 oil
  • 1/4 sugar
  • salt – sprinkle to your hearts desire

Make sure you use a large pot that has a fitted lid.
Take your oil and pour into pot.
Heat your burner to a medium-high heat.
Drop in 3 popcorn kernels.
Put your lid on and listen carefully.

IMG_0023

When you hear 3 pops, take off your lid and add in your 1/2 cup of kernels and your sugar and stir around (do all of this quickly). Replace your lid again and lower your heat a little (medium- low). I keep the pan moving back and forth until I hear popping. Once it gets pretty active in there lift your pot every 3 counts, and then lower it on the heat again. Repeat. Sometimes I don’t even put it back on the heat and I just keep my shaking it back and forth in the air. Make sure you have one hand firmly on the lid and use 2 pairs of oven mitts (one for each hand) because the oil may pop out of the lid a little. Once the kernels have stopped popping open your lid and add your salt. I usually just put some in the palm of my hand and sprinkle it (like feeding the chickens). Be sure to stir it so the salt covers evenly. It’s really hot when it first comes out so let it cool (especially for the kids). The darker pieces are where the sugar has caramelized. Sooo Yummy!! Enjoy and don’t get discouraged if it doesn’t come out perfect the first time. Practice makes perfect!

IMG_0028

Thursday, February 17, 2011

ONE MONTH LATER…

I’MMMMM BAAAAACK. We’ve been REALLY busy around here with all of the house preparations. To bring you up to speed… We are selling our house (or at least going to try to) starting in March. I’ve made it a goal to get the girl’s room to actually LOOK like a girl’s room. So after finally finding an inexpensive ( but cute bedspread) we needed to amp up some of their already established decorations in their room. We had a long shelf that needed to be repainted and hung up. So we painted it a pepto bismal pink (that’s the best way to describe it) and then I needed something on top…

Which brings me to my latest project. It took a couple of weeks to finish. Between sick kids, dinners, cleaning, preschool classes, and regular everyday life I finally finished. My bff Lisa Larson helped me (and pretty much held my hand) throughout the whole thing.  Here’s what we did…

Lisa had a long piece of wood that was about 2 inches thick. We had it cut into pieces 4”, 4 1/2”, and 5” tall. Afterwards, we (Lisa) sanded the blocks for a smooth surface. We both chose our paint colors. I chose a dark chocolate color while Lisa’s was an off white… how appropriate. 
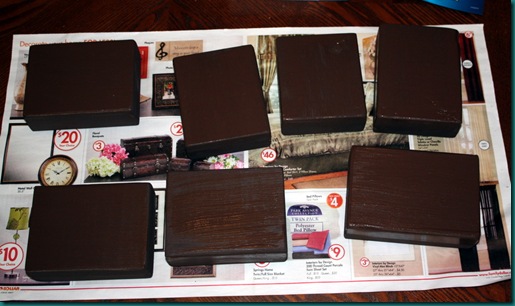
IMG_0032

After painting both sides and letting them dry we cut our pieces of scrap paper to fit the front of the paper. We liked a little bit of the brown to show around the front, so the paper was a little bit shorter. We used scrap paper, embellishments, and ribbon from Archivers.  With the scrap paper we Mod Podged the paper and let it dry. Then Lisa happened to have a Cricket which are wicked expensive… I want one. But I’m not holding my breath. We cut out our letters. Mine spelled out “SISTERS” and Lisa’s spelled out “SWEET GIRL”. Then we Mod Podged those on also. After everything dried, we Mod Podged the whole darn thing (we LOOOOVE some Mod Podge… It acts a glue, sealant, and adds a glossy finish. Ok… So time for some embellishments. This was kind of the hardest part. You wanted to incorporate all of your colors, plus you didn’t want to repeat yourself in your patterns. After finally finding the PERFECT combination… Here’s how it turned out.
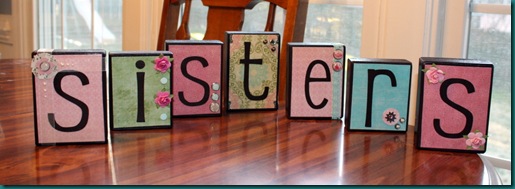
IMG_0062 

Here’s an up close look to some of the letters…

 IMG_0059
IMG_0060 IMG_0061

I’m REALLY pleased with how they turned out. If I didn’t have Lisa to help me, they would have turned out TERRIBLE!! When I got home I immediately put them up and of course stared adoringly.

And then took too many pictures.

IMG_0070 IMG_0064

Sunday, November 28, 2010

Christmas Crafts

(Quick Shout-Out to my girl Lindsay who I’m “stealing” both of these craft idea’s from. Thank you. Thank you. Thank you. )

Here are two fast and easy crafts. My friend Lindsay found this great website where you can make an Ornament Wreath. It only consists of a wire hanger, ~80 ornament balls, and ribbon. I made mine this weekend and it turned our FANTASTIC! It was fast and so fun. My girls had a blast helping me too. Here’s how mine turned out, and here’s where to find it! (Thanks Lindsay for being so crafty!)

IMG_0075

Thank you Eddie Ross for being such a creative genius!

The second cute craft I’m also loving! Lindsay (once again) found this little gem. I haven’t personally done this specific craft but I have all the materials rearing to go! 

Here’s Lindsay’s…

Don’t you just LOVE the way the light shines through them? Like little Halo’s. Love it! Beyonce would be proud.

Projects-6 Projects-5

HERE’S where you can find it.

Tuesday, November 23, 2010

CANDLES

If you’re anything like me you like your house to smell good. Not the Lysol-I’ve-Cleaned-All-Day kind of smell though. I’m talking- YUMMY- walk in and BAM! cinnamon… or BAM! vanilla. I’m also a sucker for Yankee Candles. However, I can walk in and blow $30-$40 just on candles. Ridiculous! Some AWESOME alternatives that I’ve found throughout the years are the Febreze Candles. They don’t have a waxy smell when they burn, and they’re larger then the Glade. The Holiday’s are the perfect time to pick up some of those great housewarming scents too. I have found 3 that are my favorites so far…

Cinnamon Sugar & Homecinnamon_sugar_home_candle_hero


Pumpkin Harvest & Fall
pumpkin_harvest_candle_530x390


Winter Evening and Warmth *my favorite so far*
candle_winterEvening_hero

I also recently bought an Airwick Candle. I’ve never tried their candles before. All I know is one of the Lavender smells makes me want to throw up… so this is a leap of faith in my opinion. I had a coupon and it was on sale. I’ll let you know how it works out. In case you’re curious it’s called …

CRACKLING FIRE & WARMING SPICE062338834276

Wednesday, November 10, 2010

A Simple 6 Pocket Bag


During the week Better Homes and Gardens sends me emails on how to be more creative. Some of it’s kind of weird but every once in awhile you come across a fun little project that is inexpensive and fun. As soon as I saw this bag I thought it was really cute. Granted, I don’t own a sewing machine and I keep forgetting to steal my mom’s when we go and visit… so I haven’t made this little gem yet. However, I thought I’d pass it along anyways.  It’s a perfect church bag to throw together for your kids or it would make a fun little spring bag depending on the fabric you use. If you’re anything like me, it’ll take you until spring to complete it.

bag

What You'll Need

  • 1/4 yard blue print (straps)
  • 2/3 yard blue-and-green print (pockets)
  • 2  10-1/4-x-14-1/4-inch rectangles thin, firm batting
  • 1 yard green print (lining)

Finished Bag

  • 8 x 10 x 4 inches
  • Quantities are for 44/45-inch-wide, 100% cotton fabrics.
  • Measurements include 1/4-inch seam allowances.
  • Sew with right sides together unless otherwise stated.

Cut Your Fabrics

Cut pieces in the following order.

From blue print, cut:
  2  4-x-34-1/2-inch strips

From blue-and-green print, cut:
  2  14-1/2-x-16-1/2-inch rectangles

From green print, cut:
  2  14-1/2-x-20-1/2-inch rectangles

How to Make It

Assemble Straps

  1. Fold a blue print 4-x-34-1/2-inch strip in half lengthwise with wrong side inside; press.
  2. Open and fold long edges into center; press. Refold in half and press. Topstitch 1/8 inch from outer edges to make a strap.
  3. Repeat steps 1 and 2 to make a second strap. 

Assemble Bag Units

  1. Fold one blue-and-green print 14-1/2-x-16-1/2-inch rectangle in half lengthwise with wrong side inside to make an 8-1/4-x-14-1/2-inch pocket rectangle; press. Repeat with remaining blue-and-green print rectangle to make a second pocket rectangle.
  2. Referring to Diagram 2, with right sides together, layer a green print 14-1/2-x-20-1/2-inch lining rectangle and a pocket rectangle. Place a 10-1/4-x-14-1/2-inch batting rectangle under the layered pieces; pin all layers together.
  3. Referring to Diagram 2, pin ends of a strap to the bottom edge of layered pieces, leaving 4 inches between strap edges.
  4. Place a pin on each side of strap 10 1/4 inches from bottom edge. Beginning at bottom edge of layered pieces, topstitch one side of strap up to the pin marking 10 1/4 inches; remove pin, sew across strap, and topstitch back down to bottom edge. Repeat with remaining side of strap to complete one bag unit.
  5. Repeat steps 2 through 4 to make a second bag unit.

Layer Bag Units

6. Layer bag units' with right sides together; pin. Pin loose portion of straps in place to prevent catching them in stitching. Join units around all edges, leaving a 5-inch opening at top center for turning (Diagram 3). Press seams open. 

Finish Bag

7. To shape flat bottom for bag, at one corner match bottom seam line to side seam line, creating a flattened triangle (Diagram 4). Measuring 2 inches from point of triangle, draw a 4-inch-long line across triangle. Sew on drawn line. Trim excess fabric. Repeat with remaining bottom corner of bag, and both corners of green print lining.
8. Turn bag right side out through opening and finger-press seams. Slip-stitch lining opening closed. Insert lining into bag.